Download the complete guide to using the advanced vacation features in CommunityWFM 5.0. Includes the guide for agents.
Image files: A .zip folder with .png and .jpg versions of PTO classification icons for vacation, sick leave, personal time, and holidays.
Excel for accrual import: A template Excel file to use if manually uploading agent time off accrual hours.
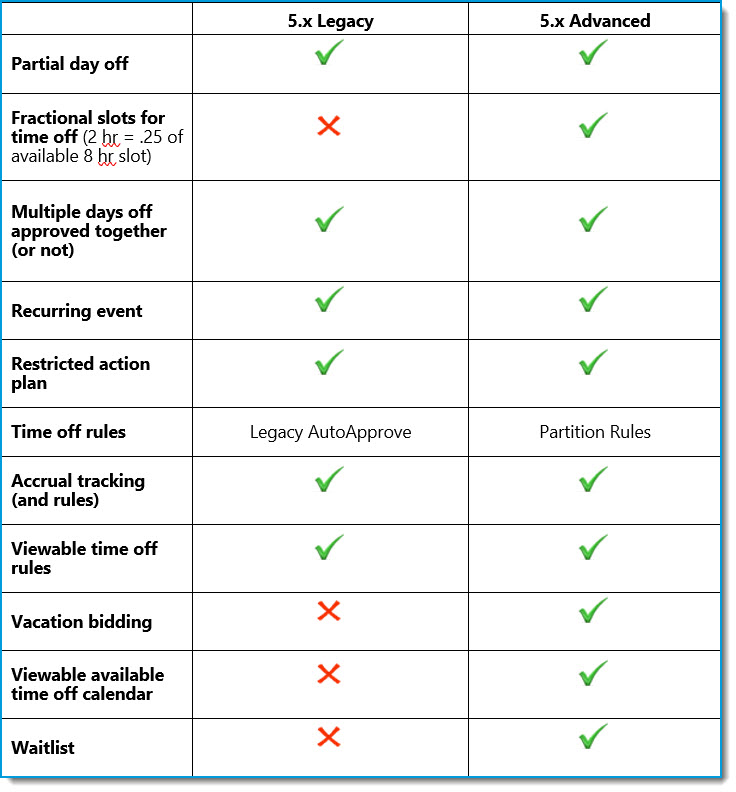
Legacy auto-approve vs. calendar partition rules (advanced)
While there is continued support for the legacy time off workflow, there are many benefits to using the new PTO features.
 All Things Time off
Glossary
Accrual: The accumulation or increase of something over time. In All Things Time Off, agents accumulate (accrue) hours to use for time off from work.
Accrual rates: How much and how often time accrues. May be via an external source such as an Excel spreadsheet, manual adjustments, or via the CommunityWFM engine.
Accrual schedule: The rate at which agents accumulate hours. Accrual schedules may be weekly, monthly, or annually. The amount accrued may be based on length of service if those with longer service earn more time off, or the same for all agents.
Bid round: A period of time designated for agents to ‘bid’ with other agents for time off within a PTO calendar. Bid rounds are typically for a set period of time, after which the bids are approved or denied. Calendar rules determine the allowable block sizes, the number of agents who may bid at the same time, and other parameters.
Block: A single time off request made by or on behalf of an agent during a bid round. See Selection.
Calendar partition: The calendar partition establishes time off rules, bidding rules, and manages the time off bidding process. It’s the mechanism by which agents can request to use their accrued hours in a bid round or during open selection. If participating in a calendar partition, an agent may not request time off for that time period using the legacy request system.
Classification: A way to organize and report time off. Assign events to a classification, then assign classifications to a policy. You may create multiple classifications, but the same event may not be included in more than one classification. Classifications may be included in more than one policy.
Open selection: A period of time when agents may request time off in a calendar without bidding against other agents for the same days. Calendar rules are used to validate then approve or deny the request.
Policy: Policies establish accrual rules for classifications. Employees are assigned to only one policy. Policies might include full-time exempt, part-time non-exempt, etc. You may create as many policies as needed to cover all employee situations; however, an employee may be assigned to only one policy. Employees must be assigned to a policy in order to apply accrued time and participate in calendar partitions.
PTO: Planned time off.
Published calendar: The published calendar includes all of the time off accruals and the policies governing time off requests for that time. Once published, there’s no going back. You cannot “unpublish” the calendar.
Restricted action plan (RAP): A mechanism to prevent automatic time off approval for certain agents. RAPs may also be used to restrict access to the website, mobile application, and to prevent participation in ASAPs and schedule swaps. Default reason codes include corrective action, disciplinary action, or additional training required. You may create additional codes as needed and apply codes to individual agents within their profile.
Selection: In a bid round, a selection is the sum of all of the blocks (requests) within a bid round response. See Block.
Waitlist: In a calendar partition, the waitlist is available when a request fails a brownout rule.
Working accrual calendar: Similar to a working schedule, the working accrual calendar allows you to refine and fine tune accruals, classifications, and policies prior to publishing. You can create as many working accrual calendars as needed.
Preparing for All Things Time Off
Prior to setting up time off accruals, establishing policies, creating calendars, etc., there are a few settings to check and adjust in the Enterprise Model, application settings, and agent profile settings.
PTO Accrual calendar start
Enter the PTO accrual calendar start date in the Enterprise Model Basic Settings (Settings > Enterprise Model > Enterprise properties) and verify the settings at the site/activity level (Use the default from the parent activity or select new date). This date will be used to determine when accruals begin and when they are applied. The date will appear in the Working accrual calendar properties, where you will be able to edit the year, but not the day/month, which are set in the Enterprise Model settings.
Enterprise Model settings
Site/activity level
If different sites within your organization have different accrual start dates, you can change the start date for each site.
Restricted Action Plan Codes
If you want to prevent agents who are under disciplinary action or requiring additional training from requesting time off, you may apply restricted action plans (RAPs) to individual agents. This does not include new hires who are on probation (this is covered within a policy). To create new reason codes: Settings > Application settings > People settings > Agent RAP reason codes.
Apply the codes in an agent’s profile: Settings > People & agent templates > People > Personal profile > Restricted action plans for [agent name].
PTO Calendar Partition Monitor Service
If you plan to automatically open bid partitions, you must designate an impersonated user in the application services: Settings > Application settings > Administrative settings > Services > PTO Calendar Partition Monitor Service > Impersonated user id.
Also, Service enabled? must be set to Yes.
Published PTO Accrual Calendar Monitor Service
If you plan to use the system’s accrual engine, designate the Service Account as the impersonated user in the application services: Settings > Application settings > Administrative settings > Services > PTO Accrual Calendar Monitor Service > Impersonated user id. Also, Service enabled? must be set to Yes.
Auto-approve services
If the system will approve time off requests based on your rules, configure the service parameters for Auto-Approve Service. Settings > Application settings > Administrative settings > Services >Auto-Approve Service. With this setting, approvals and denials will come from “the system” instead of a person.
The Process delay should be set to 10 minutes.
Multi-day event request
CommunityWFM has the ability to have the auto-approve service approve multi-day requests only if all days are valid. When selected, if one day fails, the entire request fails. This feature may be turned off if preferred. When the service evaluates a multi-day event with the setting Yes, all the dates in the range must be approved together, the request is seen as a block / one request in reports and in the auto-approve service. If “No, some of the dates can be approved and some denied,” the days are seen in reports and in the auto-approve service as individual days. Note: To use the waiting list, the request must specify Yes, all that dates in the range must be approved together.
Settings > Application settings > Administrative settings > Services > Auto-approve Service > Advanced options tab.
Time zone localization
Do you want to localize the request times? and What time zone option should Auto-Approve use? are hardcoded to use the requesting person’s time zone. This provides the most accurate results for the auto-approve service.
Number of days in advance
If you have a calendar for next year, for example, and want the auto-approve service to run to approve or deny requests using the brownout rules, set the Number of days in advance to consider event requests to cover the timeframe of the calendar.
Agent settings
Hire date ranking
If an agent’s hire date/years of service will determine accrual of time off hours and/or seniority-based ranking for time off bids, there must be a hire date in the agent’s profile.
To enter a hire date: Settings > People & agent templates > People > Personal profile > Basic properties for [name] > Hire date.
To set up ranking profiles: Settings > Application settings > People settings > Ranking profiles.
If ranking is based on a department hire date that is different from the company hire date, you can add a custom property to use for seniority-based ranking.
- Go to Settings > Application settings > People settings > Custom properties for people.
- Create a new custom property for department hire date. Because this is a text field, enter the hire date as YYYYMMDD to ensure accuracy.
- After setting up the custom property, apply it to the agents in their personal profile: Settings > People & agent templates > People > Personal profile > Custom properties.
Employee classification
If you have different accrual rules for part-time and full-time employees, ensure that you have created employee classifications and that each employee has a designated employee classification: Settings > People & agent templates > People > Personal profile > Basic properties for [agent name]. These classifications are typically created during initial training.
Employee ID
If you plan to import time off accruals from an external source such as an Excel spreadsheet, there must be non-duplicated content in the Employee ID field, i.e., an identifier unique to each agent. This field must match exactly the data in the external source, including leading zeros. Settings > People & agent templates > People > Personal profile > Basic properties for [agent name].
Time off rules source
Each agent will have a time off settings rule indicated in their profile: Settings > People & agent templates > People > Personal Profile > Time off settings for [name] > General time off settings – Configure basic settings > Select the source of time off rules.
- Legacy AutoApprove Rules
- PTO Calendar Partition Rules
The default setting for new installations and upgrades is Legacy AutoApprove Rules. If you will be executing bids or using a calendar partition, the source of time off rules must be PTO Calendar Partition Rules and there must be a ranking profile that may be applied to agents (such as seniority). Agents with Legacy AutoApprove as a rules source will be listed as Ineligible to participate in a calendar partition.
If you will be using time off accruals but not calendar partitions and want CommunityWFM to validate accrued time off prior to auto-approving time off requests, be sure to enable the Agent Accrued Hours Rule.
See also Time off rule settings.
Other settings
Event Types
Create/verify all of the event types you will use in your PTO Classifications such as Paid time off, Sick time, Leave of absence, etc. Event types are typically created during your initial CommunityWFM training sessions. Settings > Application settings > Event type settings > Event types.
Special calendar events
Verify that you have configured any special calendar events (e.g., holidays when the contact center is closed). These events can be applied in the rules of the calendar partitions. You can’t create events directly in the calendar partition rules, so complete these before setting up the partitions. Plan > Special calendar events.
Rules
Verify that you have created any brownout, blackout, and minimum request interval rules, which you can import into the calendar partitions. You can also create these rules within a single calendar partition.
All things time off
Follow the same principle as other areas of CommunityWFM: Left to right; top to bottom. Follow these general steps:
- Enter your company’s time off accrual schedule(s) (if using CommunityWFM as the software of record for time off).
- Define the classifications (groups of event types).
- Set up the policies (rules) and assign participants.
Accrual Schedules
Accrual: In All Things Time Off, agents accumulate (accrue) hours to use for time off from work.
How will you add accrued time off to CommunityWFM?
- CommunityWFM will calculate and be the primary source of time off accruals.
- Upload accrued hours from another source (e.g., an Excel spreadsheet).
- Manual adjustments to individual agents.
If you plan to import accrued hours from an external source (e.g., manual upload of Excel file), you can skip ahead to PTO classifications.
Using the CommunityWFM Accrual Schedules
CommunityWFM can determine the number of accrued hours each person receives weekly, monthly, or annually based on their number of years of service. To use this accrual method, each person must have a hire date in their agent profile.
Set up an accrual schedule for each category of employee with different accrual rates. For example, if exempt and non-exempt employees with the same number of years of service accrue time off at different rates you will create two accrual schedules. Within each schedule, you provide the number of hours earned for each set of years of service. For example, if full-time agents earn 80 hours of vacation time per year the first year, 96 hours per year for years 2–4, and 112 hours per year after 5 years, you’ll create three accrual steps within one accrual schedule.
Set up a new accrual schedule
Step 1: Basic properties
Set up a new one: Click here to create a new accrual schedule.
- Enter a name (50-character limit)
- Description is optional (255-character limit)
- Click Save.
Step 2: Intervals
Click New accrual step.
Define the amount of time earned in hours based on years of service. Calculations within CommunityWFM are based on the year of hire date in each agent’s profile.
Years of service: Select from the drop-down. Service intervals are from less than a year to 40+ years in whole years only; no partial years/decimals allowed. Add a new interval (accrual step) for each length of service boundary with a different accrual rate.
For example: If an employee earns 8 hours per month for the first year, then 12 hours per month the second year, then 16 hours per month for more than four years—
Select Less than a year and enter 96 as the Total annual accrual (in hours) (8 hours x 12 months). Click OK.
Add a New accrual step, select 1+ years, and enter 144 as the Total annual accrual (in hours) (12 hours x 12 months). Click OK. Add a New accrual step, select 4+ years, and enter 192 as the Total annual accrual (in hours) (16 hours x 12 months). Click OK.
When finished, click the Accrual schedules link to return to the list of accrual schedules or Time off settings to go to the next step (PTO Classifications).
PTO classifications
Classifications group multiple event types into a single reporting bucket to better manage time off accruals.
An event can be included in only one classification. You will assign classifications to time off policies, to use in bidding, and they are seen by agents in their time off worksheet.
A classification may be used in multiple policies.
Set up a new one: Click here to create a new PTO Classification.
1. Properties: Configure the basic properties for the PTO Classification.
1.1 Classification name: (required) 50-character limit.
1.2 Description: Optional.
1.3 How should the events in this classification be accounted for? Select whether events in this classification will contribute to discretionary or non-discretionary shrinkage totals.
1.4 Default annual accrued hours (required): What is the usual number of hours accrued for this type of classification? For example, vacation may be 40 hours. Allows you to not have to repeat the same hours for every new policy (but you can edit for an individual policy).
1.5 Display color for graphs, etc. Select from the list.
2. Member event types
An event type can only be in one classification. Once assigned to a classification, that event type will not be available to add to any other classification.
2.1 Click Select member event types.
Any previously associated event types will display, or No event types are currently assigned to this PTO Classification.
2.2 Click Include event types. The listed event types are specific to your company and were created during your initial CommunityWFM training sessions.
2.3 Click Include for each event type you wish to include in this classification. Once selected it will disappear from the list. When finished, click Dismiss.
Display image: Upload an image to associate with this PTO Classification. Browse to an image on your computer or drag and drop. Images for vacation, sick time, personal time, and holiday are available for download in the Zendesk support guide.
A confirmation message confirms a successful upload:
PTO policies
Establish accrual rates and rules and assign participants to the PTO policies. You may create as many policies as needed; however, an employee may be in only one policy. Agents must be part of a PTO Policy to apply accrued hours and participate in calendar partitions (bidding and open selection).
If you will be adding accruals via an Excel import, you will create a policy that includes that setting.
Set up a new one: Click here to create a new PTO Policy.
Setup options PTO Policy
Properties: Configure the basic properties for the PTO Policy.
- Name: (required) 50-character limit.
- Description: Optional.
- Click Save.
Security: Establish access permissions to restrict access to this PTO Policy.
PTO Classifications
**If you are uploading accrued time via an external application, this is where you will configure the setup.**” Choose which PTO Classifications to include in the PTO Policy and set accrual rules for each member classification. PTO classifications can live in multiple PTO policies. These policies are global, but the rules are local to the policy.
- Click Set up PTO classifications. Any previously associated classifications will display, or No classifications are currently assigned to this PTO policy.
- Click Include PTO classifications.
3. Click Include for each classification you wish to include in this policy or select Include all classifications. Once selected it will disappear from the list. When finished, click Dismiss.
4. Next, configure each PTO classifications for this PTO Policy: You need to define the rules at this step.
Click Configure to open the PTO Policy Classification Worksheet for each, one at a time.
On-screen messages and color-coding confirm which sections are complete, and which require additional configuration.
Configure the Basic Settings
Select how you will determine the total accrued hours.
Do not accrue hours – accrual transactions originate from an external application. Select this option if you will upload accrued time using an Excel file or another external source.
Specify a fixed number of PTO hours. Use this option if everyone in this policy gets a fixed number of hours per accrual period. Enter the fixed number of hours everyone in the policy will receive. The default is the number of hours entered when setting up the classification.
Use an accrual schedule based on years of service: If selected, you will see the list of accrual schedules. Click Details to review the accrual schedule. Click Select for the accrual schedule to apply to this policy. You may select only one accrual schedule for the policy. The selected schedule will highlight with yellow.
Enter a specific number of PTO hours for each participant (allows applying individual number of hours for each person). Enter the default number of hours to apply to each person, the maximum allowed accrued hours, and minimum number of accrued hours.
Allow negative balances for this classification? Can agents use time not yet accrued? For example, if an agent has 12 hours of vacation time but wants to take 2 days (16 hours) off and will earn that time in the next month, is this allowed? This setting applies to the auto-approve service; manual override is possible.
- No, participants can only request available PTO hours.
- Yes, but participants have a limit on the number of negative PTO hours. Specify the maximum number of negative hours allowed.
- Yes, and the limit on negative hours is equal to the participant’s accrued PTO hours. Refers to total accrual based on the accrual policy (e.g., an agent earns a total of 80 hours for the year but wants to take all 80 hours in January. This is allowed with this option).
Configure accrual settings
If using external source for accrued hours, this section is not necessary (and not available).
When does the accrual period begin? Annually on a fixed calendar date. Everyone in this policy is on the same accrual period: the same fixed calendar date.
At what rate do the hours accrue? Select an accrual interval rate.
- Annually at the beginning of the accrual period.
- Monthly on a selected day of the month.
- Weekly on a selected day of the week.
For biweekly, select weekly and accruals will load weekly on the selected day of the week.
For new employees, do you enforce a delay in time off accrual during the first year? If so, specify the number and interval (days or months) of the delayed accrual period.
- No, new employees accrue hours just like veteran employees. There is no delay in accrual.
- Yes, delay accrual hours for new employees but the total accrued hours is unchanged. E.g., employees earn a full year of time, but can’t take any time off for the first six months.
- Yes, delay accrual hours for new employees, and the total accrued hours reflects only eligible intervals. Employees will not accrue any hours during the delayed accrual period.
If yes, How long do you delay PTO accrual for new employees (from the hire date)? Specify number of days/months.
Accrual rollover settings
Specify if and how accrued hours rollover into subsequent accrual periods.
If using an external source for accrued hours such as an Excel spreadsheet, this section is not necessary (and not available).
Do you allow accrued PTO hours to roll over? Select a rollover policy.
No, any available hours of PTO are forfeited at the end of the accrual period. Use it or lose it.
Yes, a fixed number of available accrued hours may be rolled over to the next accrual period. Specify the total number of hours allowed.
Yes, a percentage of available accrued hours may be rolled over to the next accrual period. Specify the percentage of hours allowed. (1%, 5%, and 5% increments up to 100%). Percentage is based on total accrued hours, not balance of remaining hours.
Do the rolled over hours ever expire? This only appears if there are rollover hours (hours are not forfeited).
Hours rolled over never expire.
Hours rolled over expire on a fixed month and day. Specify the number of eligible hours and the month and day.
Hours rolled over expire after a relative amount of time. Specify the eligible hours and how long after the end of the accrual period are rolled over hours available.
When complete, you may close the PTO Policy Classification Worksheet.
Return to the list of Classifications and configure any other classifications for this policy. The green check or yellow exclamation mark indicates configured classifications—a green check if using CommunityWFM accrual or yellow exclamation mark if using external source for accrual.
When finished, click Refresh to confirm that all classifications have defined rules. When all classifications are complete, click Dismiss.
Participants
Choose the people who will participate in this PTO Policy. People can only be in one policy and will not be available in the list to add to an additional policy.
Select Set up policy participants.
In the pop-up window select Add people.
Choose participants by activities in the Enterprise Model, the supervisor tree, custom user group, or manually choose people.
You can restrict to employee classifications (e.g., full-time, part-time).
Reminder: You can’t add a person to more than one PTO Policy group.
Select Include all or click in the row of each person you wish to select then click Include selected. Agents with a green border are already included in the policy. When finished, close this window.
To remove selected people – close this window and click the remove people button on the Currently assigned people screen. From the list, select the people you want to remove.
After selecting all of the desired participants, click Dismiss.
Time Off Rule Settings
Plan > All things time off > Time off settings > Time off rule settings.
Customize the list of time off rules used to evaluate time off requests.
Click on the time off rule source name to review and edit individual rules.
Legacy AutoApprove Rules: You can import blackout days, brownout days, and minimal request intervals. For example, if there is an event where the office is closed and you’ve already entered that into CommunityWFM as a special calendar day, you can import that day into All Things Time Off and designate it as a blackout day. This will ensure that people who request that day off don’t have it auto-approved, which could affect reporting.
PTO Calendar Bid Round Rules: Does not include the minimum request interval rule. At this time, this rule is not available to be applied to agents (and is not needed for the advanced vacation features).
PTO Calendar Partition Rules: Agents must be assigned to this rule if you will be using the advanced vacation features.
Waitlist Queue Rules for Calendar Partition Rules: Waitlist rules apply when a brownout rule was applied and an agent chose to be placed on the waitlist for that date.
For each rule, you may select whether to enforce the rule, and whether to validate the rule when a person makes a time off request.
Customize time off rule settings
Plan > All things time off > Time off settings > Time Off Rule Settings > Customize time off rules.
If using accruals in CommunityWFM — whether the native accrual system or uploading from an outside source — turn on the Agent Accrued Hours Rule if you want the auto-approve service to validate agent time off requests against their accrued time. Other rules are turned on by default.
Rules must be enabled for the auto-approve service to validate agent requests with both the legacy system and the new calendar partition.
- If using calendar partitions, the Agent Accrued Hours Rule will be turned on by default.
- In the legacy auto-approve rules source, the Agent Accrued Hours Rule is turned off by default.
To enable the Agent Accrued Hours Rule
1. Click on the Edit icon in the far-right column.
2. Select Yes to enforce the rule in general, and to have the validation run when an agent makes a time off request. Note: The validation does not run in real-time with the Recurring time off event request form, but the rules will still apply.
PTO calendars
Build and maintain your working accrual calendar, published accrual calendar, and calendar partitions. Accrual calendars monitor the amount of time agents have in their “bank,” and the calendar partitions are where agents make time off requests.
Calendars cannot be longer than one year, and the end date must be after the start date.
When naming your PTO Calendar, be as specific as possible. This name will be used in the notifications sent to agents and in reports. E.g., “Vacation 2022 Jan-Jun” instead of “next years' time off.”
Working accrual calendars
Working accrual calendars are where hours are applied agents. The working accrual calendar works in a similar way to working schedules: A way to test fit the accrual process. The working calendar is not visible to agents and the hours are not applied to agents until you publish the working accrual calendar.
Set up as many working accrual calendars as you need. You can create a working accrual calendar at the Enterprise level or a site level, but not at a folder or activity level. After publishing, the link between the working and published calendar is broken, you can’t publish it again. After reaching a time when you won’t need to review the working files, you can safely delete them.
The Calendar accrual start date is set at the Enterprise Model level (Settings > Enterprise Model > Enterprise properties > PTO accrual calendar start month and day), but you can select a different year at the calendar level.
Reminder: Once published, the working accrual calendar cannot be unpublished.
1. Setup
Click here to create a new working accrual calendar.
Configure the basic properties, security, and custom notifications for this working accrual calendar.
2. Basic calendar settings
- Calendar name: required.
- Please select an Activity from the tree: Enterprise level or site level.
- Please select the PTO policy from the list: select from the list of policies previously created.
- Select the accrual calendar start: month and day are based on the PTO accrual calendar date field in the Enterprise Model and site set up and cannot be changed here.
Click Save to complete the basic set up.
Security and notifications (part of the basic setup) may be viewed and configured by returning to the Basic Setup tile.
3. Security
Configure security privileges associated with this working accrual calendar, limiting who can view it.
a. Configure security permissions: Confirm the user information and the calendar name.
b. Click Continue. If no permission is set, the calendar is accessible to all users.
c. Click the + to set up access permission.
Select from the people list, community group list, or by user role. For each, click Grant access to allow that person, group, or role to view the calendar. Once selected, it will disappear from this list and appear on the Configure security permissions list, where it will also display the number of members and a link to see who is in the group.
d. Click the magnifying glass to view who has access to the calendar with the current settings. If there are no security settings, everyone will be able to view the calendar.
e. Click the globe to remove the current security settings. You will need to confirm that you wish to remove all security settings.
4. Notifications
If desired, disable the notifications sent to participants when the calendar is published.
Click PTO Accrual Calendar Published to expand and view the list of standard notifications. Select Disable from the drop-down menu for any you wish to discontinue from this calendar.
To edit the notifications: go to Settings > Application settings > Administrative settings > Notifications > Select Configure event details by channel to display the list of all notifications and use the arrows to expand the list. Select the notification you wish to edit and select Edit message from the available actions drop-down menu.
5. Accrual tables
This is where you will generate, import, or revise the accrual tables for the participants included in this calendar.
Create initial accrual totals
The purpose of this step is to create the baseline number of hours for each person in the calendar. The settings from the selected PTO Policy generate the baseline accrual totals for each participant attached to the policy.
If using Excel import or other external source for accruals: You will still create initial accrual totals and verify participant accrual totals of 0 hours. This will create the placeholder in the system to populate with your imported hours.
Click Create initial accrual totals.
In the pop-up window, click Generate baseline totals. After generating, click Dismiss.
Verify participant accrual totals
Verify or enter each participant’s accrual totals for this accrual calendar.
To change a person’s accrual, click the edit button (pencil), add the new total accrued hours for the calendar period, select whether to automatically verify the total, add a comment (required), and Save.
Note: If you are using system generated accruals, the edit button will not be available, but you can add/remove hours for an individual agent by doing a manual adjustment.
You must verify each classification if there is more than one for the agent. If one is verified and one not verified, the banner will be yellow. If none are verified, the banner is red. When all are verified, the banner is green.
To verify all classifications for all agents using the Bulk edit tool:
- Verify the total accrued PTO hours for a selected classification (then pick the classification).
- Verify the total accrued PTO accrual hours for all classifications, or
- Edit the total accrued PTO hours for a selected classification.
If you have verified hours for an individual agent, that agent will not be included in the bulk edit (as they are already verified).
Reminders:
- All agents must have their hours verified before you can go to the next step of generating accrual transactions.
- After verifying the accruals, you can’t return to the verification section.
Generate, import, or enter accrual transactions
This determines how often and when participants receive their allocation of hours (annually, monthly, or weekly), based on the PTO policy interval rules. You may generate accrual transactions for all classifications or only a selected classification. If there is a rounding issue, the over or under will be allocated in the first accrual transaction of the year.
For each person in the participant list who is part of the policy, this is the actual transaction to give the person their time.
For each classification click Select. You can only do one classification at a time. You may import accrual transactions from Excel or use the accrual rate from the policy in CommunityWFM.
If you have previously generated or imported accrual transactions for a classification, repeating this step will remove all existing transactions.
Excel import of accruals
If you have an existing accrual system for time off, you can import accrued hours or accrual balances into CommunityWFM using an Excel spreadsheet. Once imported, you will follow most of the same steps to identify classifications, create policies, and create calendar partitions where agents can submit time off requests.
New in 5.1SP2: There is an option to import accrual balances to a published accrual calendar.
The import spreadsheets are slightly different.
Transactions includes columns for transaction date and accrued hours.
Balances includes columns for effective date and balance.
Reminders:
- Employee ID must match exactly, including leading zeros.
- All classifications must match exactly.
- Reason should match exactly.
- If monthly accrual, add a new row for each month for each agent (i.e., each agent will have 12 rows). For weekly accrual, add a new row for each week for each agent (i.e., each agent will have 52 rows).
- Save, then close your completed worksheet. If the worksheet is open, you will not be able to import it.
If using Excel import: Click Select next to File Import – Excel. Note: File must be .xls or .xlsx.
Step 1: Click Upload a new file. You may also select from previously uploaded files.
Select Upload a file or click and drag the file into the window. Note: The file must not be open on your computer during the upload.
If you have already uploaded a file, click Select an existing file instead then select your file from the drop-down menu on the next screen.
Click Next.
Step 2:Select the Sheet name from the list. If you did not rename the worksheet, it will have a name of Sheet1$. There will be a $ at the end of the sheet name. CommunityWFM will analyze the columns and data and create the fields.
Step 3: Select or Create an Import Template.
Add a template name and verify that the column names match the field names then click OK.
Select the Template.
Step 4: Verify and import. Review the imported data. Green checkmarks indicate agents who will have hours imported. Red Xs indicate agents who will not be imported. Yellow X warnings are agents who have an issue but can still be imported.
Common reasons for a red X include:
- the agent is not included in the calendar partition
- there was no employee ID
- the employee ID did not match a name
- employee ID field is formatted as number or missing leading zeros
- classification does not match a classification in the policy
Reasons for the yellow warning include (you can still import these):
- Misspelling of the agent’s name, or nickname used instead of given name.
Click Import all Valid or Import all Including Warnings. You cannot import agents with the red X (and the Import button is greyed out.
Click Next.
Review to confirm the imported data is correct then click Finish.
Community native accrual provider
PTO Classification
1. Select the PTO Classification: Do these one at a time by clicking Select.
2. What participants do you want to include? Select a group or select individuals. Generate intervals for an individual participant then select the participant(s), or Generate intervals for a group of participants (all participants in the working accrual calendar, by Activity or Enterprise Model, by supervisor, or custom user group).
3. Click Generate accruals. A green check indicates success.
4. When finished, close the pop-up window. A green check mark in the Transactions exist? column confirms the transactions.
5. Click Cancel to return to the Accrual options window.
Edit accrual transactions (opens in a new window)
If needed, fine tune the accrual transactions for your PTO classifications by editing the individual transaction ledger. You can’t remove a transaction, but you can make an adjustment to make corrections.
- Click the agent’s name.
- Click the Classification name.
3. Click Make adjustment.
4. In the pop-up window, select a date for the transaction.
5. Enter the number of hours to add or remove. No partial hours allowed. To remove hours, include a minus sign.
6. Enter a comment (reason why hours were added or removed). Comment is required.
7. Select the Reason or Transaction Type: Options are Accrual import, Accrued hours forfeit, Accrued hours rollover, Community accrual, Manual adjustment, Rollover hours forfeit.
8. Click Save.
Report and Publish
You may run a variety of reports associated with this working accrual calendar.
Report by participant
Report each participant’s summary and detail transactions for each member PTO Classification.
Report by PTO Classification
Report each PTO Classification summary and detail transaction for each member participant.
Publish the working calendar
When you’re ready, publish the calendar to make the accrued hours available for time off requests. Upon publishing, agents will receive a notification that includes their total number of accrued hours.
Reminder: Once published, you cannot unpublish an accrual calendar. Be sure to confirm all accruals prior to publishing.
1. Click Publish the working calendar.
2. Check the box to confirm that you are ready to publish the calendar and understand that you cannot “unpublish” the accruals.
3. Add any additional comments, then Select the PTO Classifications to publish. Default is All PTO Classifications.
4. Click Next.
5. Select the participants. Default is Publish for all participant types (no filter applied). This will select the participants in the calendar, not all agents in your organization.
6. Click Next.
7. Refine the selection of participants or select Publish all.
8. When complete (the people disappear from the list), close the window.
9. Agents will receive a notification with their total accrued hours.
Published accrual calendar
Plan > All things time off > PTO Calendars > Published accrual calendar.
Review and edit the published accrual calendar showing accrual transactions, withdrawals, and rollovers.
Calendar statistics at a glance shows the calendar start and end date, total of accrued hours, currently scheduled hours, accrual balance, and number of unassigned participants.
To add someone to a published calendar, click the (Who?) link under unassigned participants. From the pop-up list, choose a PTO Policy for each person who you wish to add, then Save assignments.
PTO Policy Summary
This summary shows how each PTO Policy contributes to the total for the published accrual calendar. Within each section, a green top border indicates that there are policy transactions present; a red top border indicates no policy transactions.
PTO Classification Summary
This summary shows how each PTO Classification contributes to the total for the published accrual calendar. Note: As of 5.1SP2, this field includes both total.
Accrual Type Summary
This summary shows how each accrual transaction type contributes to the total for the published accrual calendar.
Participant Summary
This summary shows information related to the participants included in the published accrual calendar.
Manual adjustments
Adding hours for new hires, adding hours for someone who has a mid-year hire date anniversary, removing hours if someone took time off without using CommunityWFM, giving bonus vacation time to a high-performing employee, are a few of the reasons you might need to add or remove hours from an employee’s accrued time.
There are three places where you can add or remove time from an agent’s schedule: from an agent’s time off settings in their profile, from a working accrual calendar (if it has not been published yet), and from a published accrual calendar.
Agents must be part of a PTO Policy to apply accrued hours.
Manually adjust hours in personal profile PTO settings
- Navigate to the employee’s PTO settings: Settings > People & agent templates > People > Personal profile > PTO settings for [agent name].
- Select the PTO Classification to which you want to add or remove time. The adjustment must be made for an active (not closed) calendar time period and the employee must be included in the calendar partition.
- Select Show options.
- In the Edit and revise options section, select the accrual period for the adjustment, noting the eligible date range.
- Click Make adjustment.
- In the expanded section, enter the date, number of hours to add or remove (include a – to subtract hours), a comment, and select the Reason or transaction type.
- Click Save adjustment.
Your transaction will appear on the employee’s ledger of accrued time.
Manually adjust hours in a working accrual calendar
Use this method only if the accrual calendar has not been published yet.
Go to the Working accrual calendar.
- Open your selected calendar.
- Go to Set up and manage accrual tables.
3. Select Edit accrual transactions.
4. Click on the agent’s name.
5. Click on the selected PTO Classification to expand the transaction list.
6. Click Make adjustment (on the right above the table of transactions).
7. In the pop-up window, enter a date for the adjustment. The date must be within the bounds of the calendar.
8. Enter the number of hours to add or remove (include a minus sign (–) to subtract hours).
9. Enter a comment regarding the transaction (required).
10. Select a reason for the transaction.
11. Save.
Manually adjust hours in a published calendar
1. Go to the Published accrual calendar.
2. On the right side select Show Options to expand the menu options.
3. At the bottom of the options screen, select Published accrual transactions report. Filter as needed then click Apply options.
4. Select Participant summary tab to display the people in this calendar.
5. Click on the tile for the person to whom you wish to add (or remove) accrual hours.
6. On the right side select Show Options.
7. Select the date range and classification. The Make adjustment option is available only after selecting the classification.
8. Click Make adjustment, select the date for the hours adjustment, the number of hours (include a minus sign (–) to subtract hours), add a comment (required), and select the Reason or Transaction Type.
9. When finished, click Save adjustment. The hours will be added/subtracted on the selected adjustment day and the agent will receive a notification.
To upload an adjustment from an external source, select Generate accrual transactions. Click Select for File Import—Excel and follow the steps to upload from an Excel spreadsheet.
Calendar partitions
Now that we’ve established the accrued hours, it’s time to set up the mechanism by which agents can request to use these hours. The calendar partition establishes time off rules, bidding rules, and manages the time off bidding process and open selection after the completion of the bid.
Bidding is optional; calendar partitions may use open selection only.
During a bid round, the rules of the bid round apply and govern the validity of a given block and selection. A block is a request, and a selection is the sum of all of the blocks (requests) within a bid round response. During open selection people can make selections that are not part of a block (e.g., a single day, if the block rules require a request of at least 5 days), but the other calendar rules for auto-approve are still in effect (e.g., blackout days, minimum request interval).
To participate in a calendar partition (bidding or open selection), an agent must have PTO Calendar Partition Rules as the source of time off rules in their profile. Time off settings > Configure time off settings > Configure basic settings > Select the source of time off rules. If Legacy AutoApprove, the agent cannot participate in a calendar partition. And if an agent is assigned to PTO Calendar Partition Rules, there must be a calendar in place where they can request time off.
After creating a calendar partition, there is a helpful menu on the left side of the screen. From here you can link to, review, or edit all information about the calendar partition.
Overview
- Properties: Includes start and end date, whether to include prior accruals, ranking profile, whether to restrict classifications by shrinkage type.
- PTO Classifications: Which classifications are included.
- Participants: Which participants are included. Add or remove people here.
- Workflow navigation: Move between a bid round, open selection, and finalizing/closing the calendar.
Extras
- Copy calendar wizard: Make a copy of the current calendar and apply it to a different date range or copy the attributes of the calendar for the same date range for a different group of people.
- Rules, events, & available PTO.
- Security.
Reports
Accrual report — shows the accruals in the calendar. It can be filtered by month, PTO Classification, PTO Classifications & month, and by Participant summary.
- Monthly report provides four ways to review your data. Click on any month and you’ll see the accrual and bids for that month.
- PTO Classification will show you the data for all the classifications included in the calendar.
- PTO Classifications & Month will show you accruals by month and has additional filters to further drill into the data.
- Balance
- Total Accrued Hours
- Scheduled Hours
- Committed Hours
- Non-committed hours
- Participant summary shows you an agent tile view similar to that in the bid response view. You can also filter the view to provide a list view
Transactions report – Will show you at a glance Accrued, Bid, and Scheduled hours by agent.
Workflow navigation
At any time during the calendar partition set up you can visit Workflow navigation to see where you are in the setup process. The color-coded wheels let you know which steps are complete (green), your current step (purple), which may need more work (yellow), and which are not available (red) until you complete additional steps.
Basic Setup PTO Calendar
Set up a new PTO calendar partition: Click here to create a new PTO calendar.
PTO Calendar Properties
Name: Required. Be sure to use a descriptive specific name such as Vacation Bids 2022. This name will appear in reports and in agent notifications.
Description: Optional
Calendar start date: Default is today’s date. Maximum duration for a calendar is one year.
Calendar end date (inclusive): Default is one year after start date.
Include accrual transactions from days prior to start: Refers to start of calendar. For example, if your calendar starts on January 3, 2022 (Monday of your work week), and your accruals begin on January 1, you would include transactions for 3 days prior to the start to make sure it includes those accruals.
Ignore accrual transactions from days prior to end: If the calendar ends on a date after additional accruals happen, you can tell the calendar to ignore the days at the end when additional accruals occur.
Participant selection type: Bid round selection or open selection. Bid round selection = ranking profile and other bid rounds rules will apply. Reminder: Agents must have PTO Calendar Partition Rules as their rule source in their agent profile in order to participate in bid rounds. Open selection = ad hoc within the boundaries of the PTO calendar. If Open selection, you’ll skip the bidding section.
Include prior accruals when validating bid round selections: This will allow the calendar to include rollover hours (if allowed).
Minimum role to view block selections: Should agents be able to view other agent’s requests by name/picture when making their bids? If not, select Supervisor or above. Agents will still be able to see which blocks have been selected, but the names and pictures are obscured.
Obscured
Visible
Ranking profile selection: Employee rankings based your specified criteria. Seniority is a common example (ranking based on hire date).
Restrict PTO classifications by shrinkage type: Select discretionary, non-discretionary, or both.
After making all of your selections, click Save.
PTO Classifications
Click Set up PTO Classifications.
Configure PTO Classifications for this PTO Calendar: Select which classifications to include in the calendar partition. This determines the accrued hours eligible for allocation to the calendar. For example, if you have separate accruals for sick and vacation, and have classifications for each, you would include only vacation time classification in this PTO calendar partition.
Click Include for each classification to include in the partition.
Participants
Reminder: You cannot add participants to a bid round calendar that is open for bidding. If you are planning to use bid rounds, ensure that you have added all desired participants prior to opening the bidding.
Click Set up calendar participants.
Currently assigned people: Click Add people to select who will participate in this PTO calendar. You can select from the Enterprise Model, Supervisor Group, Custom Group, etc. If a person is listed as Not eligible, you will not be able to include them. People previously assigned may be removed here.
Agents with a green bar are included.
Reasons why an agent may not be eligible:
- The agent’s source of time off rules is set to Legacy AutoApprove Rules.
- The agent is on a restricted activity plan that specifies not allowing time off requests.
- The agent is participating in/assigned to another PTO Calendar.
To change the source of time off rules: Go to the agent’s home page > Advance configuration > Time off settings - Configure time off settings > General time off settings – Configure basic settings.
After selecting the calendar participants, click Show the workflow dialog to proceed to the next step: setting up the rules for the calendar partition. Click Advance to this step.
Rules
You can import rules or set up new ones that apply only to this calendar. You may import the same rule into multiple calendars. Note: You can’t export rules created within a calendar.
Set up rules within a calendar partition
The PTO calendar worksheet displays a calendar where you can add special events such as holidays, add, remove, or edit time off rules (blackout, brownout days or minimum request interval rule), and confirm your final selections.
Scroll to the area below the calendar for menu options to configure the rules.
Special calendar events
Import special calendar events. Note: You cannot add new special calendar days directly to the time off rules calendar; create them in Plan > Special Calendar Events then import them into the calendar partition here.
If there are no eligible special calendar events, or if you have already added all eligible special calendar events, you will see:
Time off rules
You can add specific rules that will apply only to this calendar. You may import existing rules, or create new rules. Rules created within a calendar cannot be exported.
Import existing rules
Click each rule you wish to include and it will be immediately imported. Rules already imported are not available. You cannot “un-import” them here.
To remove rules, go to the edit section. When finished, close this window.
Apply new time off rules to this calendar
Rules added here will apply only to this calendar. Options include blackout dates, brownout dates, and minimum request interval rules.
For each rule type, you can change who the rule applies to by including or excluding user groups, or restrict enforcement by PTO Classification or shrinkage type. You can apply these settings to blackout days, brownout days, or minimum request interval.
Edit or delete existing calendar time off rules.
If you don’t see recently added rules, click Refresh.
Click on the rule name to edit, or the Remove button to delete.
Return to the Rules page to view the color-coded calendar with your rules applied. Use the menu at the top to filter the view to display or hide the different types of rules. You can filter for types of rules and display all or none.
Review and confirm
You must confirm your rules before moving to the next step.
Workflow navigation: Move on to the next step to setup the bidding rounds.
New Bid Round
Bid round properties
Reminders:
- If there is an open bid round in progress, CommunityWFM will not auto-approve time off requests for agents attached to the PTO Calendar if the requested dates fall within the active bid round calendar.
- Note: You cannot add agents to a bid round after the bidding has opened, even though you can add them to a calendar. Be sure to include all agents prior to opening the bid round.
- If an agent has a RAP or is on a new hire restriction, they will not be able to participate in the bid. If bidding for future dates (e.g., bidding in the fall for next year’s vacation time), consider removing the restrictions during the time of the bid. If removing for all agents, turn off the Agent Restricted Activity Plan Enforcement Rule in the rule settings (Plan > All things time off > Time off settings > Time off rule settings).
- You can only have one bid round open for any given time period for a group; the dates cannot overlap.
- If using the automatic open and close, the open and close dates must be within the calendar dates. If you want to open the bidding prior to the calendar start, you can manually open the bid.
- Once a bid is opened and then closed, it cannot be re-opened.
Click the tile to create a new bid round.
Selected PTO classification for this bid round: You can include only one classification in your bid round.
Date and time to open the bid round: Select the date and time to open the bidding. Because bid rounds cannot overlap, this date and time will determine when this bid round will be open. If there is another bid round opening at the same time, you will get an error message. Reminder: the date must be within the bid round calendar, but you can manually open the bid.
Automatic round open setting: If you select Do not automatically open the bid round for participant selection, you will need to manually open the bid round.
Date and time to close the bid round: Select the end date and time to stop the bidding.
Automatic round close setting: Select whether to automatically or manually close the bidding.
Minimum block size in hours: A block is single time off request. If you want each person to request no fewer than five consecutive days in their bid, and your Default hours for FTE setting in general settings and preferences is 8-hour shifts – the block is 40 hours. If a person may make a request for 1 day, the block is 8 hours.
For example: Companies may wish to have everyone select their full week of vacation during the first bid round, then allow people to select individual days later during open selection.
Maximum block size in hours: Is there a maximum number of days an agent can request? For example, if you want to limit agents to requesting no more than one week during the first bid round, and your Default hours for FTE setting in general settings and preferences is 8-hour shifts, enter 40 hours.
Minimum total percent of accrual balance: Do agents need to use a percentage of their accrued time? For example, if agents earn 80 hours a year, you can require that they use at least 20 hours (25%) in the bid. Several blocks can add up to the minimum total percent.
Maximum total percent of accrual balance: You can also set a maximum percent of hours. This can help throttle the total hours used by any agent. For example, if you want to prevent agents from requesting 4 separate weeks of 40-hour blocks in one bid, set a maximum total percent.
Are participants allowed to make contiguous selections? Refers to selecting consecutive work days in a time off request. If No, there has to be at least one work day between each day of the request. If Yes, an agent is able to request multiple days off together. Work days are determined in the Enterprise Model Work Habits & Hours.
Examples
Select No, not contiguous, if agents have comp days or floating holidays and you want them to request them as individual days, not all together.
Select Yes, contiguous if you want them to request a full 40-hour block (one week) such as during an initial vacation bid round. In the next round you might select No, and agents can request individual days.
Override ranking profile for this bid round: Default will use the ranking profile in the PTO calendar, but you can change it for this bid round.
The difference between this and shift bidding is that there is no fixed inventory of time off requests. Each agent will bid in sequence order from the remaining PTO.
Limit the number of people who can commit at the same time? This enables limiting the number of agents eligible to commit bids at a given time. How many people can enter bids at the same time? If there are a large number of bid round participants, and staffing allows multiple people to be off at the same time, the bid will progress faster if you allow multiple people to bid at the same time. Reminder: All participants who are eligible to commit their bids are bidding for time first come / first served, i.e., their ranking no longer applies.
No, everyone participants at the same time: = first come, first served. There’s no limit on the number of people who can make requests at the same time. Bid commitment occurs on a first committed > first confirmed basis.
Yes, but only a fixed number of participants: You can designate that only a certain number of agents are allowed into the bid at the same time. As one person commits their bid, the next person is able to join the queue and commit a bid.
Yes, but only a percentage of participants: You can set a certain percentage of people who are allowed into the bid at one time. As the percentage of people who have committed bids changes, additional people are able to join the queue and commit a bid.
The number or percentage you choose should be sensitive to the size of your agent pool and the availability of your time off resources.
After building the properties, the calendar is in a pending state waiting for the date/time to automatically open or you can manually open the bidding.
Open calendars are green.
After the calendar is opened, eligible participants will receive a notification and can view available time, and even enter and validate their bids prior to their turn in the queue, but they will not be able to commit their bid until it’s their turn.
PTO bid round exception codes
Plan > All things time off > Time off settings > PTO bid round exception codes.
Create custom reason codes used to grant PTO bid round participants exceptions to various PTO rules.
There are two existing standard codes: Insufficient available accrued hours to meet bid rules, and Insufficient available PTO to meet time off rules.
Select Click here to create a new reason code.
Enter the text for your code and select whether it can be edited later then Save.
PTO bid round standby codes
Create custom reason codes for bid round participants in standby mode. Use these codes when a bid round participant is unwilling or unable to respond when it is their turn to make a request for time off.
There are two existing standard codes: Participant is not responding to administrator requests to commit and Participant is on PTO during bid round selection.
Select Click here to create a new standby reason code.
Enter the text for your code and select whether it can be edited later. Select whether this should be the default code, and whether bid participants can still commit bids while in standby mode.
Managing bids rounds
Go to the Bid Round: Plan > All things time off > PTO Calendars > Calendar partitions
Select the Calendar partition name from the Current list.
Select Show the details to open the Bid Round Worksheet.
Select Bid responses from the Bid Round Worksheet options. navigation pane.
In this example, Deborah has committed a valid bid (green), Sam has made a valid bid but has not yet committed his selection (yellow), and Jean has not yet made a selection.
Hover over the bottom of an agent tile to view additional options:
Send a message
Opens a new window to send a message to the agent using one or more notification channels.
Copy and paste the # codes below the message field to customize your message.
View or add bid round exceptions
Agents may request a bid exception if their request does not meet one or more of the validation rules. You may also enter an exception for an agent. At this time there isn’t a notification when an agent requests an exception, and agents should be encouraged to send a memo or email to their supervisor when making a bid exception request.
Create an exception for an agent
Select Click here to see this person’s bid round exceptions.
Select Create a new exception. You will be able to include any calendar participants in a later step.
- Click Create a new exception.
- Select the reason for the exception request and provide an explanation (required). If during a bid round, select the first option (Insufficient available accrued hours to meet bid rules). If making a time off request outside of a bid, use the second option (Insufficient available PTO to meet time off rules).
- Select the preferred status – approved, denied, or pending.
- On the next screen, select the bid round rule(s), Bid block rule(s), Activity time off rule(s) and/or Supervisor time off rule(s) for which you are creating the exception.
5. Click Next.
6. Select the participant(s) for this exception from the list of calendar participants.
7. Click Save exception.
To view all current exception requests (not just for one agent), go to the Calendar partition and select Show the details for the calendar to open the Bid Round Worksheet. Select Bid round exceptions from the Bid Round Worksheet options. Current bid round exceptions may be deleted, denied, approved, or returned to pending status on this screen. Exceptions will remain on this page. Once approved or denied, the agent will not be able to edit or delete the exception request.
Viewing an agent’s Bid Round Worksheet
You can view an agent’s Bid Round Worksheet and submit bids on their behalf, validate or commit their bids, or override a validation rule.
In the Bid Round Worksheet, go to Bid responses.
Hover over the bottom of the tile with the person’s name until the icons pop up. Select the gear icon.
You can review an agent’s Bid Round Worksheet, validate and / or commit their rounds, or even Add a block (make selections) for an agent (e.g., if an agent is not in the office and emails their bid selections to you).
Agents will receive an automatic notification “from” the person who made the changes.
Placing agents on standby
If an agent is not responding to requests to commit their bid, or if they are out of the office during the bid round, you can place them in standby mode. They will not lose their place in line, but someone else can make a bid and the process continue until you remove them from standby.
In the Bid Round Worksheet, go to Bid responses.
Hover over the bottom of the tile with the person’s name until the icons pop up. Select the icon on the right – Edit or create bid round standby events.
Standby event reason code: Select the reason why you are placing the person in standby (not responding or out of office on PTO) and add a comment.
Allow this participant to commit their bid while this event is open? Select whether the person will be able commit their bid while in standby mode.
The color bar for the agent’s tile will be maroon, indicating they are in standby mode.
Taking agents out of standby
Return to Edit or create bid round standby events.
Select Close this event. The window will close and the agent will return to their place in line.
Validation override
Use validation override to approve a time off request that fails validation or does not meet the auto-approve rules during a bid round.
Go to the agents Time off worksheet and review their bid request.
Select Override validation.
Select the new validation status. If Pending validation, the bid round will be automatically validated by the System Monitor service (if the service if the service is enabled).
Close the bid round
Review participant status and responses.
Send reminders if there are agents who have not committed their bids.
Go to the bid round and select Show the details.
Click Close the bid round.
Confirm that you want to close the bid round and click OK.
Click Publish the bid round to publish the round.
A pop-up window will display all of the participants, their ranking, and their bids. At this window you can choose to commit any uncommitted bids.
Note: Any bids not committed by the agent during the bid round, or by you prior to publishing the bid, will no longer be available after publishing the bid round.
Check the box to confirm that you understand you cannot make additional edits, add a comment, then click Publish this bid.
Publishing the bid round will send a memo to the participants and place the time off events on their schedule.
Open Selection
After completing (publishing) a bid round, you can move to open selection where agents can request time off without waiting in line to bid. The rules for the calendar will still apply.
You may also skip the bid round and go directly to open selection.
To advance to open selection, go to the PTO Calendar overview, select Workflow navigation, and click Advance to this step. This changes the round to open selection.
PTO summary: Click to refresh the graph at the top of this page and review the accrued hours, scheduled hours, and accrual balance for this calendar.
PTO requests: Click to open the requests at the top of this page. Review any pending requests. You can validate the request if there are rules, and approve, deny, or delete the request.
Current waitlist status. This is available only if there are waitlist requests.
Close the PTO calendar. Open selection will continue until the calendar close date or until you manually close the calendar. Until the close date (or manual close), agents may continue to submit time off requests.
Closing the calendar
When you are ready to close the calendar to any further changes, go to the PTO Calendar overview, select Workflow navigation, and review any remaining requests.
Click Advance to this step.
The calendar will close, and you cannot return to the Workflow navigation menu.
Waitlist
The waitlist function is available as part of advanced vacation; it is not available when using the legacy time off request system.
If an agent requests time off on a day with brownout rules, and there are already requests for the maximum amount of time for that day, the agent has the option to add themselves to a waitlist. If the time becomes available, the agent has the option to accept the time off and if necessary, can forfeit existing time off requests.
- Waitlist is not available during bid rounds.
- Waitlist is not available for all types of requests.
- There is no ranking in the waitlist – it’s first requested | first granted.
- When selecting to join a waitlist, agents will see how many others are in line.in front of them.
- If there is one day in a multi-day request that is not available for the waitlist (e.g., a blackout day), the waitlist option is not available. This is true even if each day is an individual request (the agent selected No, some of the dates can be approved and some denied when making the request).
- Requests on the waitlist have a status of Denied.
- When waitlist hours become available, the agent will receive a memo that waitlist hours are available and will need to go to their time off worksheet to accept or decline the hours.
- The agent will need to have available accrued hours or be willing to give up future requests to accept the waitlist offer.
View the waitlist | deny requests
Plan > All things time off > PTO Calendars > Calendar partitions > [Calendar Partition Name]
In the Current waitlist status tile click Show the PTO waitlist. Any current waitlist items will appear at the top of the page. You can delete an agent’s request here. Note: there is no notification to the agent that the waitlist request has been deleted, though the status changes to not waitlisted on their Upcoming time off list, and the agent cannot re-add the event to the waitlist.
To approve, deny, or return to pending waitlist requests
Report > Published schedule > Published event summary > Enterprise model
Select the date range and use the Event type filters to narrow the report to time off requests.
From the report options tabs, select Show event details. The far-right column has the buttons to manage the waitlist requests.
An agent can remove themselves from the waitlist by going to their time off worksheet and selecting Delete in the Pending & Upcoming requested time off section. The agent can also revise previously selected hours to forfeit or remove themselves from the waitlist queue by opening the waitlist queue.
Waitlist rules
Plan > All things time off > Time off settings > Time off rule settings
To turn off the waitlist option, edit the rule setting and change Configured for waitlist? To No.
Copy calendar wizard
Step 1: Choose what type of copy you want to make
You have two options when making a copy of a calendar: Make a copy with the same participants for a different date range, or replicate to keep the same date range but for a different group of people.
Copy to another date range
You can make other edits when customizing the calendar properties. Edits here do not affect the original calendar.
Step 2: Customize the calendar properties
Preferred calendar status option:
- Same status as the source PTO calendar—
- Default to the basic properties status—
Name: Default is “Copy of…”
Calendar start date: When you change the start date, the end date automatically adjusts so the number of days matches the original calendar. You cannot change the duration of a calendar with a copy.
Include accrual transactions from days prior to start: Refers to start of calendar. For example, if your calendar starts on January 3, 2022 (Monday of your work week), and your accruals begin on January 1, you would include transactions for 3 days prior to the start to make sure it includes those accruals.
Ignore accrual transactions from days prior to end: If the calendar ends on a date after additional accruals happen, you can tell the calendar to ignore the days at the end when additional accruals occur.
Include prior accruals when validating bid round selections: This will allow the calendar to include rollover hours (if allowed).
Minimum role to view block selections: Should agents be able to view other agent’s requests by name/picture when making their bids? If not, select Supervisor or above. Agents will still be able to see which blocks have been selected, but the names and pictures are obscured.
Ranking profile selection: Employee rankings based your specified criteria. Seniority is a common example (ranking based on hire date). Agents must have a ranking profile included in the custom properties of their profile.
Participant selection type: Select bid round or open selection.
Restrict PTO Classifications by shrinkage type: Discretionary, non-discretionary, or both.
Step 3: Bid round and time off rule preference
Do you want to include bid rounds in the new PTO calendar? Selecting Yes will include existing bid rounds in this calendar. If No, when you open the new calendar and go the Workflow navigation, you can change to open selection.
Rules: Review each rule and check the boxes for those you wish to copy to the new calendar. You may also Select none or Select all.
Step 4: Choose participants to include
The list contains participants assigned to the selected PTO calendar, and indicates if they are eligible to participate in the new PTO calendar. Click on the participant’s name to include them, or use the Select all or Select none buttons. Note: To include different participants, use the replicate calendar wizard.
Step 5: Confirm the settings
Review all of the setting for your new calendar. If correct, click Copy PTO calendar. A copy is made in the background.
To view the new calendar, go to Plan > All things time off > PTO Calendars > Calendar partitions and select your new calendar.
Replicate this PTO calendar
You can make other edits when customizing the calendar properties. Edits here do not affect the original calendar.
Step 2: Customize the calendar properties
Preferred calendar status option:
- Same status as the source PTO calendar—
- Default to the basic properties status—
Name: Default is “Copy of…”. If creating multiple copies, the name will include a copy number.
Calendar start date: Because this is a replication, you cannot edit the dates. To make a copy of the calendar with different dates, use the option to copy to another date range.
Include accrual transactions from days prior to start: Refers to start of calendar. For example, if your calendar starts on January 3, 2022 (Monday of your work week), and your accruals begin on January 1, you would include transactions for 3 days prior to the start to make sure it includes those accruals.
Ignore accrual transactions from days prior to end: If the calendar ends on a date after additional accruals happen, you can tell the calendar to ignore the days at the end when additional accruals occur.
Include prior accruals when validating bid round selections: This will allow the calendar to include rollover hours (if allowed).
Minimum role to view block selections: Should agents be able to view other agent’s requests by name/picture when making their bids? If not, select Supervisor or above. Agents will still be able to see which blocks have been selected, but the names and pictures are obscured.
Ranking profile selection: Employee rankings based your specified criteria. Seniority is a common example (ranking based on hire date). Agents must have a ranking profile included in the custom properties of their profile.
Participant selection type: Select bid round or open selection. If the original calendar is in a bid round and you did not include bid rounds in your copy: after you finish creating the calendar, return to Plan > All things time off > PTO Calendars > Calendar partitions and open your new calendar. You will have the option to confirm that you wish to mark the calendar as open, select a date to close the calendar, and notify participants.
Restrict PTO Classifications by shrinkage type: Discretionary, non-discretionary, or both.
Step 3: Bid round and time off rule preference
Do you want to include bid rounds in the new PTO calendar? Selecting Yes will include existing bid rounds in this calendar. If No, when you open the new calendar and go the Workflow navigation, you can change to open selection.
Rules: Review each rule and check the boxes for those you wish to copy to the new calendar. You may also Select none or Select all.
Step 4: Participants
You cannot copy the participants when replicating a calendar.
Step 5: Confirm the settings
Review all of the setting for your new calendar. If correct, click Copy PTO calendar. A copy is made in the background. To view the new calendar, go to Plan > All things time off > PTO Calendars > Calendar partitions and select your new calendar.
Legacy time off requests
Types of time off
Planned time off events: Refers to partial day, single day, or multi-day events, validated in real time against designated rules and may be approved or denied by the rules engine. There is an option to approve all days together or independently – approving some days and not others. Available event types differ by role, with agents seeing only events that require supervisor approval.
Recurring time off events: Refers to single or multi-day events, with designated start and end time, with possible long date range, and a recurrence pattern of daily or specified days of the week. Events of this type are not validated in real time but will run against any rules (blackout, brownout, minimum request interval). You are not able to specify whether to approve all days together or independently. Available event types differ by role, with agents seeing only events that require supervisor approval. These events might include leaves of absence, military service, etc.
Intraday events (Available only to supervisors and above): For a single day event and with no recurrence pattern, e.g., an agent is out sick. There is an option to select How should this event influence existing work hours? Do not modify existing events on the schedule, or delete scheduled events that start on or after the event’s start time.
Review and approve/deny/pend time off requests
This applies to time off requests made outside of a calendar partition. View pending requests on your homepage. Scroll down to the Pending Request Worksheet.
In previous versions of CommunityWFM, the Event Detail Report provided a place to filter for time off requests and approve, deny, or change to pending current requests. CommunityWFM 5.x combines the detailed and summary reports, enabling better performance and efficiency.
- To reach this report go to Plan > All things time off > Time off reports. This will limit the report to time off events.
Alternatively, go to Report > Published schedule > Published event summary > select activity.
2. Depending on which report you’re running, filter it for site, supervisor, or custom user group.
3. Enter your date range.
4. Click Apply options at the bottom.
5. Click the filter at the top of the report Show event details.
This is similar to previous versions of time off requests, with the addition of the validate button.
Time off requests on behalf of agents
Create new time off requests or recurring event requests on behalf of your agents, and run time off reports. For example, if an agent is on vacation and sends you an email with their time off requests.
Manually create time off requests
Plan > All things time off > Time off events > Create.
Step 1: Specify event properties
Create a request for a portion of a day or a whole day(s): Select All day or Partial day from the drop-down menu. Partial day is limited to a single day request.
Request type: Select the event type.
Date and time: If All day, select the Start date and End date for this request. If Partial day, you will select the default start and end time for the single day request. Partial day requests cannot include more than one date.
If Partial day: How do you want to pick the times for your partial day off? Options include the event type default start and end times or entering a custom time. If using the default, the start and end time for the event will display (and not be editable).
Comments: Required.
Step 2: Select how to include other participants.
How do you want to choose your participants? Choose participant type from an activity or the Enterprise Model, a supervisor tree, a custom user group, or manually. Click Next.
Step 3: Choose participants.
For each agent you wish to include or exclude click Pending, Approved, or Denied. To remove a selection, click it again. To change the selection, click the preferred option. After you complete your selections, click Next.
Step 4: Finished
Review the list of participants and their status. Each row represents one day for each agent. Click Finish.
The scheduled time off will now be on the agent(s) schedule.
Manually create recurring time off events
Create recurring time off events on behalf of one or more of your people. Example: Military or family leave (FMLA).
Plan > All things time off > Time off requests > Create recurring time off events
Step 1: Specify event properties
Request type: Select the event type.
Start date and End date: You will have the option to specify days after selecting the dates and times.
Start time and End time: Select times from the menu. If time varies by day, create separate recurring events for each time frame.
What recurrence pattern should apply to this request? Options include every day in the specified date range or only on selected days of the week. If selected days of the week, select the days.
Comments: Optional.
Click Next.
Step 2: Select how to include other participants
How do you want to choose your participants? Choose participant type from an activity or the Enterprise Model, a supervisor tree, a custom user group, or manually.
If you assign multiple people, how do you want the events scheduled? Options include Treat each person’s event as an individual assignment (allows removing or changing the event for a single person without affecting the others) or Treat the event as a single event assigned to all participants (moving the event will move it for everyone).
Click Next.
Step 3: Choose participants
For each agent you wish to include or exclude click Pending, Approved, or Denied. To remove a selection, click it again. To change the selection, click the preferred option. After you complete your selections, click Next. You will be asked to confirm you selection.
Step 4: Finished
Review the list of participants and their status. Each event for each agent will be on a new row in date order. Click Finish.
The scheduled recurring event will now be on the agent(s) schedules.
Time off reports
Review time off events from the published schedule and update the review status for qualified events.
Plan > All things time off > Time off reports > Enterprise Model, Supervisor tree, or Custom user group.
This Time off report includes only time off events. Choose your activity and dates, click Apply options, then you can slice the data multiple ways.
- Event data summarized by date
- Summarized by day
- Summarized by week
- Summarized by month and year
- Summarized by year
- Summarized by day of week
- Event data summarized by event type
- Totals by event type
- Totals by event type and date
- Totals by event type and week
- Totals by event type, month and year
- Totals by event type and year
- Totals by event type and day of week
- Event data summarized by PTO classification
- Totals by PTO classification
- Totals by PTO classification and date
- Totals by PTO classification and week
- Totals by PTO classification, month and year
- Totals by PTO classification and year
- Totals by PTO classification and day of week
- Event data summarized by participant
- Show total scheduled hours by participant
- Show total scheduled hours by participant and event type
- Show total scheduled hours by participant and PTO Classification
- Event detail report with no summary
You can also run an executive summary:
or a review status summary:
If you have an average hourly wage defined in your Enterprise Model, within select reports you can see the estimated costs associated with your time off events.
You can select which data to show in the graphs by selecting or deselecting an item from the graph legend, then easily export your data and graphs directly from the completed reports.
Appendix
Accrual via Excel Import validation rules and messages
The validation rules for a working accrual calendar Excel import are as follows:
- The name (first and last name) must be part of the working accrual calendar
- This is an ERROR message
- Could not find a calendar participant with the provided first and last name.
- The PTO Classification must be part of the PTO Policy based on the name of the PTO Classification
- This is an ERROR message
- Could not find a PTO Classification as part of the selected PTO Policy with the imported name.
- The PTO Classification name should be the same as the selected classification for “generate accrual tables.”
- This is a WARNING message
- Found a matching PTO Classification, but it not the selected classification
- The Transaction Date must be a valid date
- This is an ERROR message
- Transaction Date value must be a valid Date value.
- The reason code provided must be present and valid. If this rule fails, the user may import the row but it will use the default reason code.
- This is a WARNING message
- No reason code provided, or an invalid reason code provided. Import can use the default adjustment reason code.
-
The accrued hours column must be a valid decimal value (2 places), and it must be between the stated minimum and maximum allowed hours for a single transaction.
- This is an ERROR message
- Accrued hours must be a valid Numeric value between system defined transaction minimum and maximum.
- The transaction date must be within the participant’s valid calendar transaction range given the PTO period defined by the working accrual calendar. For fixed-annual accrual dates, this will be the beginning of the accrual period (defined by the working accrual calendar). But for hire date accrual periods, it will be the anniversary of the hire date (given the current accrual period) to the day prior to the next anniversary date.
- This is a WARNING message
- The imported transaction date does not conform to the boundaries of the PTO Policy rules for the selected classification.
The validation rules for the published accrual calendar Excel import are as follows:
- If the user is importing for a specific participant then:
- The name (first and last name) must be the same as the selected participant. This is to ensure that you are not mistakenly importing hours for the wrong person.
- This is an ERROR message
- The imported participant’s name does not match the selected participant’s name
- The name (first and last name) must be the same as the selected participant. This is to ensure that you are not mistakenly importing hours for the wrong person.
- If the user is importing for multiple participants at one time then:
- The name (first and last name) must be defined in the database (t_agent table).
- This is an ERROR message
- Could not find a participant with the provided first and last name.
- The name (first and last name) must be defined in the database (t_agent table).
- The PTO Classification name must exist
- This is an ERROR message
- Could not find a PTO Classification with the imported name.
- If the user selected a classification, then validate that the classification matches the one selected. This is to ensure that the user doesn’t accidentally import transactions for the wrong PTO Classification.
- This is a WARNING message
- Found a matching PTO Classification, but it is not the selected classification.
- The reason code provided must be present and valid. If this rule fails, the user may import the row but it will use the default reason code.
- This is a WARNING message
- No reason code provided, or an invalid reason code provided. Import can use the default adjustment reason code.
- The accrued hours column must be a valid decimal value (2 places), and it must be between the stated minimum and maximum allowed hours for a single transaction.
- This is an ERROR message
- Accrued hours must be a valid Numeric value between system defined transaction minimum and maximum.
- The transaction date must be within the selected (reported) Accrual Period. This is to ensure that the imported spreadsheet doesn’t have weird dates included.
- This is an ERROR message
- The imported transaction date is outside the boundaries of the selected accrual period.
Quick tips
Add agent(s) to a published calendar
(See also separate document: Adding A New Agent to ATTO)
Single person
Settings > People & agent templates > People > Current list > Personal profile >
PTO settings for [name]
- Under time off settings, select Set up the PTO policy
- In the pop-up window, select the PTO Policy from the drop-down menu then Save.
Multiple people
Plan > All things time off > PTO Calendars > Published accrual calendar
- Click the (Who?) link under Unassigned participants.
- From the pop-up list, choose a PTO Policy for each person who you wish to add then click Save assignments.
Add or remove accrued time (single agent)
From a Working Accrual Calendar
- Select Set up and manage accrual tables.
- Select Edit accrual transactions.
- Select an agent’s name.
- Select the PTO Classification tile.
- Select Make adjustment.
From a Published Accrual Calendar
- Select an agent’s name.
- Select Show Options.
- Select the accrual period.
- Select a PTO Classification from the drop-down.
- Select Make adjustment.
Change an agent’s time off rules source
Note: To convert a large group of agents to calendar partition rules, use the Agent Synchronization Wizard (Settings> People & agent templates > Synchronize people > Synchronize people now)..
If an agent’s time off rule source is Legacy AutoApprove Rules, they will not be able to participate in a calendar partition.
Settings > People & agent templates > People > Current list > Personal profile >
PTO settings for [name]
- In General time off settings click Configure basic settings.
- In the pop-up window, select PTO Calendar Partition Rules from the drop-down.
- Save.
Review and approve/deny an agent’s time off request
If requests are made outside of a calendar partition and you do not need to review the resulting effect on your staffing:
- On your home page, scroll down to Pending Request Worksheet.
- Filter as needed to display request(s).
- Using the icons on the right, deny, approve, or validate the request.
To review all time off requests
- Go to Plan > All things time off > Time off reports (To view all events, go to Report > Published schedule > Published event summary).
- Filter for then Apply options.
- Click on a date in the Reporting date column.
- Transactions for the date will open in a new page.
Assign an agent to a PTO policy
Settings > People & agent templates > People > Current list > Personal profile >
PTO settings for [name]
- In PTO Policy select Set up the PTO policy.
- In the pop-up window, select a policy from the drop-down menu.
- Save.
Set up a custom ranking profile
Go to Settings > Application settings > People settings > Ranking profiles
- Click here to create a new ranking profile.
- Enter a name (required).
- Select a start time preference option (average start time, or start time from first scheduled day).
- Select a start time penalty factor.
- Save.
- Configure preferred sorting criteria.
Make a time off request in a calendar partition bid round
- Go to Plan > Time off worksheet.
- In the Time off worksheet options, select Calendar Partitions.
- Click on the tile with your calendar partition to open the partition worksheet.
- In the left side menu – PTO Calendar overview options – click Time off bid rounds.
- In the Bid Round tile, click Show this bid round status.
- Click Add a block or to view available time, click Show available PTO.
Bid Round – Change the number of people who may bid at the same time.
- Open the Calendar partition.
- In the Bid Round tile, select Edit the properties.
- Edit the number for the last question: How many participants can commit the bid at the same time?
- Save.
Where can I find Bid round responses?
While the bid is open, go to the calendar partition > select Show the details in the bid round tile > In the Bid Round Worksheet Options select Bid responses. See Managing bids rounds.
FAQs
Can I add an agent to an ongoing bid round?
Unfortunately, once the bid round is open and agents are actively validating and committing their selections, you cannot add additional members. However, after the bid round has closed, if you change the calendar to a state of “open selection” you can add eligible participants.
Is there validation when agents request a recurring time off event?
The validation engine does not run in real-time for recurring time off events but the rules (brownout, black-out, minimal interval request) will still apply. This is expected behavior as it’s not practical to have real-time validation of these long-term recurring events.
Why isn’t the Auto-approve service running?
Settings > Application settings > Administrative settings > Services > Auto-Approve Service
- Is the service turned on? Check if Service enabled? is set to Yes.
- What is the setting for process delay? Default is 10 minutes. With the increased number of rules in the system, it takes longer to run through all of the rules.
- How far in advance are the requests? Check the Number of days in advance to consider event requests and adjust to cover the time off requests.
- Are single-day event permissions days checked? Check the days on which you want the service to run.
- Is it a multi-day event? Check the box for the service to approve multi-day time off requests (does not apply to recurring time off event requests).
Why did the legacy auto-approve system approve time off when the agent didn’t have enough accrued hours?
If the agent is assigned to Legacy AutoApprove Rules, check to make sure the Agent Accrued Hours Rule is set to Yes for User Validate at runtime.
What file formats are valid for uploading PTO accruals/balances?
Valid file formats are .xls and .xlsx.